

Feb 17, 2014

Nov 15, 2012

Nov 2, 2012
Now available: No-Cost, No-Touch App Lifecycle Management for Lean Teams
It's available now. It's Team
Foundation Service, a new way for teams who care about rapid
software delivery to plan and manage projects. And for teams up to 5
developers, it's free.
Writing code is fun, but managing development can be complicated. Do you keep your code under version control? Where do you keep track of bugs and new features? How do you keep your team on the same page? Now you can utilize Team Foundation Service to do all these things today, with zero additional infrastructure.
Stop standing up servers. Stop installing and configuring multiple pieces of software to support your development process. With Team Foundation Service, you get an easy-to-use and easy-to-administer cloud-based solution that handles the critical elements of application lifecycle management, such as version control, agile planning and automated builds. Now available for development teams worldwide, Team Foundation Service benefits include:
Writing code is fun, but managing development can be complicated. Do you keep your code under version control? Where do you keep track of bugs and new features? How do you keep your team on the same page? Now you can utilize Team Foundation Service to do all these things today, with zero additional infrastructure.
Stop standing up servers. Stop installing and configuring multiple pieces of software to support your development process. With Team Foundation Service, you get an easy-to-use and easy-to-administer cloud-based solution that handles the critical elements of application lifecycle management, such as version control, agile planning and automated builds. Now available for development teams worldwide, Team Foundation Service benefits include:
 |
Accessible from anywhere, using existing and familiar tools.
|
Plan projects, collaborate with your team, and manage your
code online from anywhere using any modern web browser. Works with all
editions of Visual Studio 2012 (even Express!), as well as Eclipse and other
tools (by using our command line client).
|
|
 |
|
|
Get started quickly, with no infrastructure to manage.
|
Go from "sign up" to your first project in minutes,
and set up a Continuous Integration (CI) build in a few easy steps. Your
source code and work items are stored in the cloud, making server
configuration a thing of the past.
|
|
|
|
|
All languages and platforms welcome.
|
From C# to Python, from Windows to Android, you can use a
variety of languages and target a variety of platforms. Our services are
designed to help you focus on what you do best—building great apps.
|
|
|
Get started today by signing up for your free account!
Team Foundation Service is being made available to teams of up to five developers for FREE. Sign up today, invite up to four team members and start collaborating for no cost. To get started, visit: http://tfs.visualstudio.com.

Jul 2, 2012
C#: Storing and Retrieving Images from SQL Server Using Strored Procedures
Introduction
First of all I have to tell you I am not a Expert but I will try by best to explain the solution. In this article I am going to explain how to store and retrieve image from SQL server database by using C# as the front end programming language and Stored Procedures as the back end language for SQL server. Reason to write article about this topic is give proper understanding for the beginners.
Prerequisites
You need basic knowledge about Stored Procedures and C# language.
Tools Used
- SQL Server 2008
- Visual Studio 2010
- C# (Windows Form Application)
Preparing the Development Environment
SQL Server Environment
Creating Tables
In this example I am going to use only one table call ImageData and it only contain two fields call ImageID and other one is call ImageData, data types of this fields are
int and image. Use below SQL script to create table.
 CREATE TABLE [dbo].[ImageData]
 (
    [ImageID] [int] IDENTITY(1,1) NOT NULL,
    [ImageData] [image] NULL,
 CONSTRAINT [PK_ImageData] PRIMARY KEY CLUSTERED
 (
    [ImageID] ASC
 )
 WITH (PAD_INDEX  = OFF, STATISTICS_NORECOMPUTE  = OFF, IGNORE_DUP_KEY = OFF,
 ALLOW_ROW_LOCKS  = ON, ALLOW_PAGE_LOCKS  = ON) ON [PRIMARY]
 )
 ON [PRIMARY] TEXTIMAGE_ON [PRIMARY]
Creating Stored Procedures
In this example I am going to use Four(4) Stored Procedures call ReadAllImage, ReadAllImageIDs, ReadImage, SaveImage and use below SQL scripts to create those Procedures.
CREATE proc [dbo].[ReadAllImage] as
SELECT * FROM ImageData
GO
CREATE proc [dbo].[ReadAllImageIDs] as
SELECT ImageID FROM ImageData
GO
CREATE proc [dbo].[ReadImage] @imgId int as
SELECT ImageData FROM ImageData
WHERE ImageID=@imgId
GO
CREATE proc [dbo].[SaveImage] @img image as
INSERT INTO ImageData(ImageData)
VALUES (@img)
GO
Visual Studio Environment
Creating Windows Form
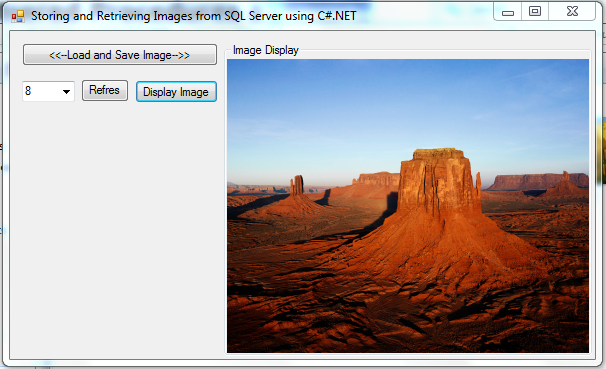
In this exapmle I am going to use only one Form and set basic properties according to the below table.
Control
Name
Property
Name
Property
Value
Form
Name
UsingSPs
Text
Storing and Retrieving Images from SQL Server using C#.NET
Button1
Name
btnLoadAndSave
Text
<<--Load and Save Image-->>
Button2
Name
btnRefresh
Text
Refresh
Button3
Name
btnDisplayImage
Text
Display Image
ComboBox
Name
cmbImageID
GroupBox
Name
grbPicBox
Text
Image Display
Anchor
Top, Bottom, Left, Right
PictureBox
Name
picImage
Dock
Fill
|
Control
Name
|
Property
Name
|
Property
Value
|
|
Form
|
Name
|
UsingSPs
|
|
Text
|
Storing and Retrieving Images from SQL Server using C#.NET
|
|
|
Button1
|
Name
|
btnLoadAndSave
|
|
Text
|
<<--Load and Save Image-->>
|
|
|
Button2
|
Name
|
btnRefresh
|
|
Text
|
Refresh
|
|
|
Button3
|
Name
|
btnDisplayImage
|
|
Text
|
Display Image
|
|
|
ComboBox
|
Name
|
cmbImageID
|
|
GroupBox
|
Name
|
grbPicBox
|
|
Text
|
Image Display
|
|
|
Anchor
|
Top, Bottom, Left, Right
|
|
|
PictureBox
|
Name
|
picImage
|
|
Dock
|
Fill
|
Start Cording
Now we have all the things to start our cording and this is the part we have to get better concentrate of our development. Anyway I will try my best to explain the cording, then let's start our journey.
In this example I am going to use one more class call
DBHandler other than the From, purpose of this class is to handle the database connection details. Here is the code for that class.Handling Database Connection String
public class DBHandler
{
  public static string SrvName = @"DBSERVER"; //Your SQL Server Name
  public static string DbName = @"DB";//Your Database Name
  public static string UsrName = "us";//Your SQL Server User Name
  public static string Pasword = "xxxx";//Your SQL Server Password

  /// <summary>
  /// Public static method to access connection string throw out the project
  /// </summary>
  /// <returns>return database connection string</returns>
  public static string GetConnectionString()
  {
     return "Data Source=" + SrvName + "; initial catalog=" + DbName + "; user id="
     + UsrName + "; password=" + Pasword + ";";//Build Connection String and Return
  }
}
Select and Store Image to Database
Before Start the Coding add below namespaces to your code.
using System.IO;
using System.Data;
using System.Data.SqlClient;
Here I am going to explain the btnLoadAndSave button click event process step by step.
- Create Connection to the Database.
- Create object call
fopof type OpenFileDialog. - Set InitialDirectory Property of the object
fop. - Set Filter Property of the object
fop. (in here user can select only .jpg files) - Display open file dialog to user and only user select a image enter to if block.
- Create a file stream object call
FSassociate to user selected file. - Create a byte array with size of user selected file stream length.
- Read user selected file stream in to byte array.
- Check whether connection to database is close or not.
- If connection is close then only open the connection.
- Create a SQL command object call
cmdby passing name of the stored procedure and database connection. - Set CommandType Property of the object
cmdto stored procedure type. - Add parameter to the
cmdobject and set value to that parameter. - Execute SQL command by calling the ExecuteNonQuery() method of the object
cmd. - Call user defined method to load image IDs to combo box. (this method will explain later so don't worry now)
- Display save successful message to user.
- Catch if any error occur during the above code executing process.
- Finally Check whether connection to database is open or not, if connection is open then only close the connection.
Below Demonstrate the Complete Select and Store image to database code.
SqlConnection con = new SqlConnection(DBHandler.GetConnectionString());
try
 {
   OpenFileDialog fop = new OpenFileDialog();
   fop.InitialDirectory = @"C:\";
   fop.Filter = "[JPG,JPEG]|*.jpg";
   if (fop.ShowDialog() == DialogResult.OK)
   {
     FileStream FS = new FileStream(@fop.FileName, FileMode.Open, FileAccess.Read);
     byte[] img = new byte[FS.Length];
     FS.Read(img, 0, Convert.ToInt32(FS.Length));

     if (con.State == ConnectionState.Closed)
       con.Open();
     SqlCommand cmd = new SqlCommand("SaveImage", con);
     cmd.CommandType = CommandType.StoredProcedure;
     cmd.Parameters.Add("@img", SqlDbType.Image).Value = img;
     cmd.ExecuteNonQuery();
     loadImageIDs();
     MessageBox.Show("Image Save Successfully!!", "Information", MessageBoxButtons.OK, MessageBoxIcon.Information);
   }
   else
   {
     MessageBox.Show("Please Select a Image to save!!", "Information", MessageBoxButtons.OK, MessageBoxIcon.Information);
   }

 }
 catch (Exception ex)
 {
   MessageBox.Show(ex.Message, "Exception", MessageBoxButtons.OK, MessageBoxIcon.Error);
 }
 finally
 {
   if (con.State == ConnectionState.Open)
     con.Close();
 }
Retrieving and Display Image
Here I am going to explain the btnDisplayImage button click event process step by step.
- Check whether user select image ID or not from combobox.
- Check whether picture box contain image or not.
- Clear the image of the picture box if there is image.
- Create Connection to the Database.
- Create a SQL command object call
cmdby passing name of the stored procedure and database connection. - Set CommandType Property of the object
cmdto stored procedure type. - Add parameter to the
cmdobject and set value to that parameter. - Create SQL data adapter object call
adpby passing previously createdcmdobject. - Create a data table object call
dtto hold result of thecmdobject. - Check whether connection to database is close or not.
- If connection is close then only open the connection.
Objectdtfill with data by calling the fill method ofadpobjec.- Check whether object
dtcontain any data row or not. - Ccreate memory stream object call
msby passing byte array of the image. - Set image property of the picture box by creating a image from memory stream.
- Set SizeMode property of the picture box to stretch.
- Call refresh metod of picture box.
- Catch if any error occur during the above code executing process.
- Finally Check whether connection to database is open or not, if connection is open then only close the connection.
if (cmbImageID.SelectedValue != null)
{
    if (picImage.Image != null)
        picImage.Image.Dispose();

    SqlConnection con = new SqlConnection(DBHandler.GetConnectionString());
    SqlCommand cmd = new SqlCommand("ReadImage", con);
    cmd.CommandType = CommandType.StoredProcedure;
    cmd.Parameters.Add("@imgId", SqlDbType.Int).Value =
              Convert.ToInt32(cmbImageID.SelectedValue.ToString());
    SqlDataAdapter adp = new SqlDataAdapter(cmd);
    DataTable dt = new DataTable();
    try
    {
        if (con.State == ConnectionState.Closed)
            con.Open();
        adp.Fill(dt);
        if (dt.Rows.Count > 0)
        {
            MemoryStream ms = new MemoryStream((byte[])dt.Rows[0]["ImageData"]);
            picImage.Image = Image.FromStream(ms);
            picImage.SizeMode = PictureBoxSizeMode.StretchImage;
            picImage.Refresh();
        }
    }
    catch (Exception ex)
    {
        MessageBox.Show(ex.Message, "Error",
              MessageBoxButtons.OK, MessageBoxIcon.Error);
    }
    finally
    {
        if (con.State == ConnectionState.Open)
            con.Close();
    }
}
else
{
    MessageBox.Show("Please Select a Image ID to Display!!",
       "Error", MessageBoxButtons.OK, MessageBoxIcon.Error);
}
Jul 1, 2012
របៀបប្តូរ Keyboard Layout ក្នុង VB.NET
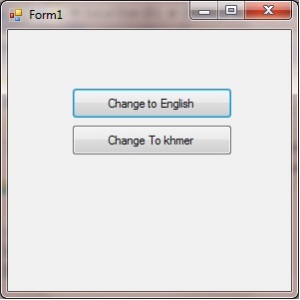
ចំពោះអ្នកសរសេរកម្មវិធីទាំងឡាយ ដែលប្រើប្រាស់ខ្មែរយូនីកូដ នៅពេលដែលចង់ប្តូរពី Keyboard Layout english ot khmer Unicode នោះ លោកអ្នកតំរូវអោយអ្នកប្រើប្រាស់កម្មវិធីចុច alt + Shift ដើម្បីប្តូរ។ សកម្មភាពបែបនេះ វាអាចបណ្តាលអោយមានកំហុសកើតឡើងក្នុងកម្មវិធី ឧទាហរណ៍ Text box ដែលត្រូវតំរូវអោយអ្នកប្រើប្រាស់បញ្ចូលទិន្នជាលេខជាដើម ប្រសិនបើ Keyboard Layout ស្ថិតក្នុងស្ថានភាព khmer (CA or KH) នោះវាបណ្តាលអោយមានកំហុសកើតឡើង។ ដើម្បីដោះស្រាយបញ្ហានេះលោកអ្នកត្រូវប្តូរ Keyboard Layout តាមរយៈការសរសេរកូដ នៅត្រង់ព្រឹត្តិការណ៍ got Focus ទៅលើ object មួយ ។ ខាងក្រោមនេះ គឺជាគំរូកូដសំរាប់ផ្លាស់ប្តូរ Keyboard Layout ទៅជាភាសាខ្មែរ រី ជាភាសាអង់គ្លេស។

Module Module1
Public Declare Function GetKeyboardLayoutName Lib “user32″ _
Alias “GetKeyboardLayoutNameA” _
(ByVal pwszKLID As String) As Long
Public Declare Function LoadKeyboardLayout Lib “user32″ _
Alias “LoadKeyboardLayoutA” _
(ByVal pwszKLID As String, ByVal flags As Long) As Long
Const KLF_ACTIVATE = &H1
‘ some languages code
Public Const LANG_ENGLISH As String = “00000409″
Public Const LANG_FRENCH As String = “0000040C”
Public Const LANG_ARABIC As String = “00000401″
Public Const LANG_GREEK As String = “00000408″
Public Const Lang_kh As String = “a0000403″
Public Const LANG_ITALIAN As String = “00000400″
Public Const LANG_GERMAN As String = “00000407″
Public Function SwitchKeyboardLang(ByVal strLangID As String) As Boolean
‘Returns TRUE when the KeyboardLayout was set properly, FALSE otherwise
Dim strRet As String
On Error Resume Next
strRet = New String(“0″, 9)
GetKeyboardLayoutName(strRet)
If strRet = (strLangID & Chr(0)) Then
‘ you are try to switch to the already selected language
‘ so return without doing anything
SwitchKeyboardLang = True
Exit Function
Else
strRet = New String(“0″, 9)
strRet = LoadKeyboardLayout((strLangID & Chr(0)), KLF_ACTIVATE)
End If
GetKeyboardLayoutName(strRet) ‘ Test if switch successed
If strRet = (strLangID) Then
SwitchKeyboardLang = True
End If
End Function
End Module
Public Class Form1
Private Sub Button1_Click(ByVal sender As System.Object, ByVal e As System.EventArgs) Handles Button1.Click
Me.Text = SwitchKeyboardLang(LANG_ENGLISH)
End Sub
Private Sub Button2_Click(ByVal sender As System.Object, ByVal e As System.EventArgs) Handles Button2.Click
Me.Text = SwitchKeyboardLang(Lang_kh)
End Sub
End Class
Source: http://laingmoam.wordpress.com/2010/01/11/%E1%9E%9A%E1%9E%94%E1%9F%80%E1%9E%94%E1%9E%94%E1%9F%92%E1%9E%8F%E1%9E%BC%E1%9E%9A-keyboard-layout-%E1%9E%80%E1%9F%92%E1%9E%93%E1%9E%BB%E1%9E%84-vb-net/
Jun 12, 2012
Tip: Importing Data from MS Access 2010 64-bit .accdb database into SQL Server using SSIS
Problem:
You can’t connect using Native OLEDB \Microsoft Jet 4.0 OLEDB Provider. It fails with following error message:
Test connection failed because of an error in initializing provider. Unrecognized database format 'C:\Users\vishah\Documents\myDB.accdb'.
Solution:
- Download 2007 Office System Driver: Data Connectivity Components from here -http://www.microsoft.com/downloads/en/details.aspx?familyid=7554f536-8c28-4598-9b72-ef94e038c891&displaylang=en
- then choose Microsoft Office 12.0 Access Database Engine OLE DB Provider and point it to your .accdb file.

Tip: Importing Microsoft Access 2007 Database Tables into SQL Server
Microsoft SQL Server 2005 and 2008 offer the Import and Export Wizard to move data to and from an external source. You can also create a basic SQL Server Integration Services (SSIS) package which can be used later in the Business Intelligence Development Project.
Now follow the several pages of the wizard. The steps below detail how to import data into a SQL Server 2005 database, but the steps are very similar in SQL Server 2008.
On the first page, select the Data source from which you want to import the data. There are several data sources also available such as:
If you have properly installed the 2007 Office System driver, you will see another Data Source option: “Microsoft Office 12.0 Access Database Engine.”

With the Import and Export wizard, you can access different types of data sources. These sources include database formats such as Microsoft Access, Microsoft SQL Server, flat files, Microsoft Excel, and Oracle. This article discusses importing Access 2007 database tables into MS SQL Server 2005/2008.
Importing Microsoft Access MDB databases (2003-format or earlier) is a built in feature of SQL Server. However, because of the difference between the database engine of Microsoft Access 2007 and earlier versions, it is not possible to connect to the Access 2007 database (*.ACCDB) using the built-in data source “Microsoft Access”. To import data from a Microsoft Access 2007 database, you must install the OLEDB Provider for Microsoft Office 12.0 Access Database Engine. Refer to the following FMS tip for details:
After installing this driver, open SQL Server Management Studio and connect to the desired instance of SQL Server database engine. In the Object Explorer, it shows database list available in that instance of SQL Server. Select a desired database or create a new one. Right Click this database and select Tasks -> Import Data.
On the first page, select the Data source from which you want to import the data. There are several data sources also available such as:
- Microsoft OLEDB provider for SQL Server
- Microsoft OLEDB provider for Oracle
- SQL Native Client
- Microsoft Access
- Microsoft Excel, etc…
If you have properly installed the 2007 Office System driver, you will see another Data Source option: “Microsoft Office 12.0 Access Database Engine.”
Subscribe to:
Posts (Atom)