Introduction
First of all I have to tell you I am not a Expert but I will try by best to explain the solution. In this article I am going to explain how to store and retrieve image from SQL server database by using C# as the front end programming language and Stored Procedures as the back end language for SQL server. Reason to write article about this topic is give proper understanding for the beginners.
Prerequisites
You need basic knowledge about Stored Procedures and C# language.
Tools Used
- SQL Server 2008
- Visual Studio 2010
- C# (Windows Form Application)
Preparing the Development Environment
SQL Server Environment
Creating Tables
In this example I am going to use only one table call ImageData and it only contain two fields call ImageID and other one is call ImageData, data types of this fields are int and image. Use below SQL script to create table.
 Collapse
 |
Copy Code
 CREATE TABLE [dbo].[ImageData]
 (
    [ImageID] [int] IDENTITY(1,1) NOT NULL,
    [ImageData] [image] NULL,
 CONSTRAINT [PK_ImageData] PRIMARY KEY CLUSTERED
 (
    [ImageID] ASC
 )
 WITH (PAD_INDEX  = OFF, STATISTICS_NORECOMPUTE  = OFF, IGNORE_DUP_KEY = OFF,
 ALLOW_ROW_LOCKS  = ON, ALLOW_PAGE_LOCKS  = ON) ON [PRIMARY]
 )
 ON [PRIMARY] TEXTIMAGE_ON [PRIMARY]
Creating Stored Procedures
In this example I am going to use Four(4) Stored Procedures call ReadAllImage, ReadAllImageIDs, ReadImage, SaveImage and use below SQL scripts to create those Procedures.
Collapse |
Copy Code
CREATE proc [dbo].[ReadAllImage] as
SELECT * FROM ImageData
GO
Collapse |
Copy Code
CREATE proc [dbo].[ReadAllImageIDs] as
SELECT ImageID FROM ImageData
GO
Collapse |
Copy Code
CREATE proc [dbo].[ReadImage] @imgId int as
SELECT ImageData FROM ImageData
WHERE ImageID=@imgId
GO
Collapse |
Copy Code
CREATE proc [dbo].[SaveImage] @img image as
INSERT INTO ImageData(ImageData)
VALUES (@img)
GO
Visual Studio Environment
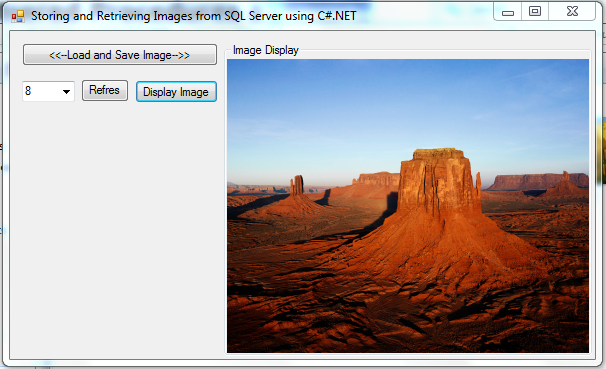
Creating Windows Form
In this exapmle I am going to use only one Form and set basic properties according to the below table.
|
Control
Name
|
Property
Name
|
Property
Value
|
|
Form
|
Name
|
UsingSPs
|
|
Text
|
Storing and Retrieving Images from SQL Server using C#.NET
|
|
Button1
|
Name
|
btnLoadAndSave
|
|
Text
|
<<--Load and Save Image-->>
|
|
Button2
|
Name
|
btnRefresh
|
|
Text
|
Refresh
|
|
Button3
|
Name
|
btnDisplayImage
|
|
Text
|
Display Image
|
|
ComboBox
|
Name
|
cmbImageID
|
|
GroupBox
|
Name
|
grbPicBox
|
|
Text
|
Image Display
|
|
Anchor
|
Top, Bottom, Left, Right
|
|
PictureBox
|
Name
|
picImage
|
|
Dock
|
Fill
|
Start Cording
Now we have all the things to start our cording and this is the part we have to get better concentrate of our development. Anyway I will try my best to explain the cording, then let's start our journey.
In this example I am going to use one more class call DBHandler other than the From, purpose of this class is to handle the database connection details. Here is the code for that class.
Handling Database Connection String
Collapse |
Copy Code
public class DBHandler
{
public static string SrvName = @"DBSERVER"; public static string DbName = @"DB"; public static string UsrName = "us"; public static string Pasword = "xxxx";
public static string GetConnectionString()
{
return "Data Source=" + SrvName + "; initial catalog=" + DbName + "; user id="
+ UsrName + "; password=" + Pasword + ";"; }
}
Select and Store Image to Database
Before Start the Coding add below namespaces to your code.
Collapse |
Copy Code
using System.IO;
using System.Data;
using System.Data.SqlClient;
Here I am going to explain the btnLoadAndSave button click event process step by step.
- Create Connection to the Database.
- Create object call
fop of type OpenFileDialog.
- Set InitialDirectory Property of the object
fop.
- Set Filter Property of the object
fop. (in here user can select only .jpg files)
- Display open file dialog to user and only user select a image enter to if block.
- Create a file stream object call
FS associate to user selected file.
- Create a byte array with size of user selected file stream length.
- Read user selected file stream in to byte array.
- Check whether connection to database is close or not.
- If connection is close then only open the connection.
- Create a SQL command object call
cmd by passing name of the stored procedure and database connection.
- Set CommandType Property of the object
cmd to stored procedure type.
- Add parameter to the
cmd object and set value to that parameter.
- Execute SQL command by calling the ExecuteNonQuery() method of the object
cmd.
- Call user defined method to load image IDs to combo box. (this method will explain later so don't worry now)
- Display save successful message to user.
- Catch if any error occur during the above code executing process.
- Finally Check whether connection to database is open or not, if connection is open then only close the connection.
Below Demonstrate the Complete Select and Store image to database code.
Collapse |
Copy Code
SqlConnection con = new SqlConnection(DBHandler.GetConnectionString());
try
 {
   OpenFileDialog fop = new OpenFileDialog();
   fop.InitialDirectory = @"C:\";
   fop.Filter = "[JPG,JPEG]|*.jpg";
   if (fop.ShowDialog() == DialogResult.OK)
   {
     FileStream FS = new FileStream(@fop.FileName, FileMode.Open, FileAccess.Read);
     byte[] img = new byte[FS.Length];
     FS.Read(img, 0, Convert.ToInt32(FS.Length));

     if (con.State == ConnectionState.Closed)
       con.Open();
     SqlCommand cmd = new SqlCommand("SaveImage", con);
     cmd.CommandType = CommandType.StoredProcedure;
     cmd.Parameters.Add("@img", SqlDbType.Image).Value = img;
     cmd.ExecuteNonQuery();
     loadImageIDs();
     MessageBox.Show("Image Save Successfully!!", "Information", MessageBoxButtons.OK, MessageBoxIcon.Information);
   }
   else
   {
     MessageBox.Show("Please Select a Image to save!!", "Information", MessageBoxButtons.OK, MessageBoxIcon.Information);
   }

 }
 catch (Exception ex)
 {
   MessageBox.Show(ex.Message, "Exception", MessageBoxButtons.OK, MessageBoxIcon.Error);
 }
 finally
 {
   if (con.State == ConnectionState.Open)
     con.Close();
 }
Retrieving and Display Image
Here I am going to explain the btnDisplayImage button click event process step by step.
- Check whether user select image ID or not from combobox.
- Check whether picture box contain image or not.
- Clear the image of the picture box if there is image.
- Create Connection to the Database.
- Create a SQL command object call
cmd by passing name of the stored procedure and database connection.
- Set CommandType Property of the object
cmd to stored procedure type.
- Add parameter to the
cmd object and set value to that parameter.
- Create SQL data adapter object call
adp by passing previously created cmd object.
- Create a data table object call
dt to hold result of the cmd object.
- Check whether connection to database is close or not.
- If connection is close then only open the connection.
dt fill with data by calling the fill method of adp objec.- Check whether object
dt contain any data row or not.
- Ccreate memory stream object call
ms by passing byte array of the image.
- Set image property of the picture box by creating a image from memory stream.
- Set SizeMode property of the picture box to stretch.
- Call refresh metod of picture box.
- Catch if any error occur during the above code executing process.
- Finally Check whether connection to database is open or not, if connection is open then only close the connection.
Below Demonstrate the Complete Retrieving and Display Image code.
Collapse |
Copy Code
if (cmbImageID.SelectedValue != null)
{
    if (picImage.Image != null)
        picImage.Image.Dispose();

    SqlConnection con = new SqlConnection(DBHandler.GetConnectionString());
    SqlCommand cmd = new SqlCommand("ReadImage", con);
    cmd.CommandType = CommandType.StoredProcedure;
    cmd.Parameters.Add("@imgId", SqlDbType.Int).Value =
              Convert.ToInt32(cmbImageID.SelectedValue.ToString());
    SqlDataAdapter adp = new SqlDataAdapter(cmd);
    DataTable dt = new DataTable();
    try
    {
        if (con.State == ConnectionState.Closed)
            con.Open();
        adp.Fill(dt);
        if (dt.Rows.Count > 0)
        {
            MemoryStream ms = new MemoryStream((byte[])dt.Rows[0]["ImageData"]);
            picImage.Image = Image.FromStream(ms);
            picImage.SizeMode = PictureBoxSizeMode.StretchImage;
            picImage.Refresh();
        }
    }
    catch (Exception ex)
    {
        MessageBox.Show(ex.Message, "Error",
              MessageBoxButtons.OK, MessageBoxIcon.Error);
    }
    finally
    {
        if (con.State == ConnectionState.Open)
            con.Close();
    }
}
else
{
    MessageBox.Show("Please Select a Image ID to Display!!",
       "Error", MessageBoxButtons.OK, MessageBoxIcon.Error);
}